A cross section plot widget is created when the user selects cross section for the mouse mode on the ROI Window and depresses a mouse button at the beginning location of the desired line, drags the mouse to the ending location and releases the mouse button.
When the cross section is calculated, it uses the zoomed data from the ROI Window, not the original showed on the Main Display Window.
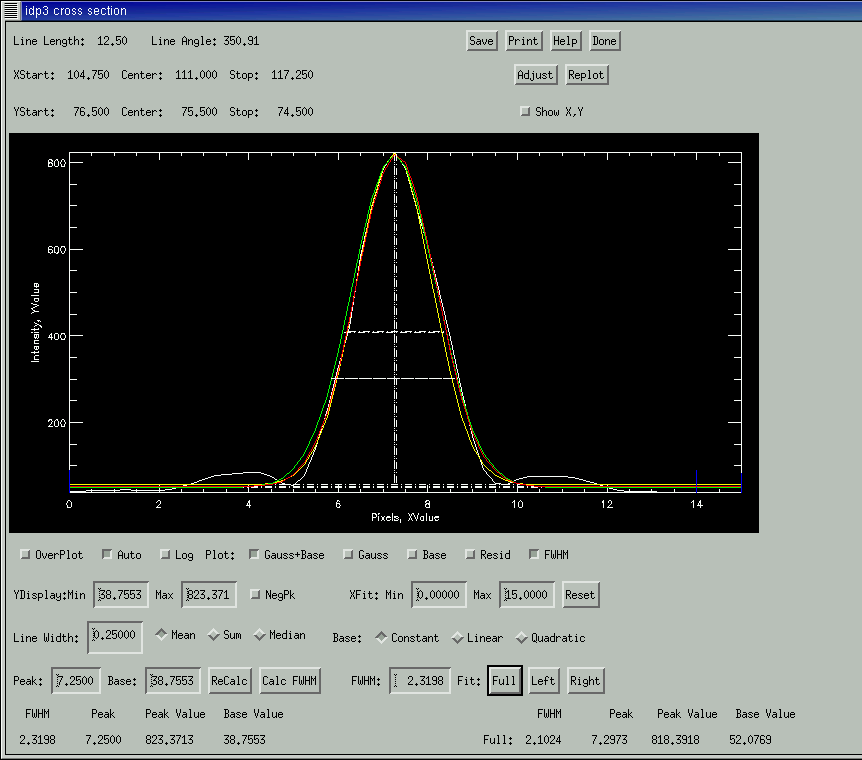
A one-dimensional gaussian may be fit to the data after a FWHM is provided. When fitting the gaussian the user may select to ignore the baseline, fit a constant for the baseline, or fit a linear baseline. If the line is very asymmetrical, the user may fit the left and right sides individually. The user may also modify the starting and ending locations of the fit by clicking and dragging on the plot to change the Xfit: Min and Max text windows. To clear the values back to the default press the Reset button.
The FWHM, Peak, Peak Value, and Baseline Value are reported at the bottom of the widget, the calculated values from the profile on the left and the fitted results of the gaussian on the right.
The user may plot the residuals, the baseline, and the FWHM on the profile by selecting the appropriate buttons. You might have to adjust the YDisplay:Min to see negative values of the rediusal. If the Show X,Y button is selected the x and y values of the plot are displayed as the cursor is dragged across the plot.
The peak and baseline values are automatically computed as the minimum and maximum of the line. These values may be changed by the user for calculating the FWHM of the line.
The Y-axis may be scaled automatically or with the user input min and max as well as scaled logarithmically. When log scale is selected, the min and max values are still given in linear units.
The default line width is one zoomed pixel. However, the user may sum, average, or median the line according to the input line width (in original pixels).
At the top of the widget the line length, line angle, x starting, center, and end positions as well as the y starting, center, and ending positions are reported.
The user may adjust the profile line with the Adjust button. The Adjust widget contains three boxes (Start/Stop, Start/Angle, Center/Angle) with similar (or redundant) information. It is important to remember the significance of each box. If the xstart value is changed in the Start/Stop box, the center, length, and angle are updated. If the xstart value is changed in the Start/Angle box, the xcenter and xend are updated keeping the angle and length fixed. In each box the user can Apply the changes or Cancel them. The user may also use the computed centroid position as the center of the line with the Centroid X,Y button in the Center/Angle box. The changes will not take effect until the user clicks the Done button.
Profiles may be overplotted with the OverPlot option.
Using the Save button, you can save a text file wit information on the the cross section and the fitted line.
You can use the Print button to print a postscript file of the graph.