An Introduction to IRAF
▼ sample_files.zipBefore We Begin
^ Go to Top
IRAF, the Image Reduction and Analysis Facility, is one of the more historic way
that astronomers reduce and analyze imaging and spectroscopic data. Essentially, the
way that you should think about it is as a terminal framework or shell on which
a number of packages and programs are built to allow you to do things. Like everything,
IRAF will make more sense once you've used it for a while.
There are quite a few guides on the internet already that teach introductory IRAF
skills. Here are some good ones:
- Josh Walawender's Introduction to IRAF
- Jeannette Barnes' Beginner’s Guide to Using IRAF
- The HMC Intro to IRAF that I helped write in college
The point of this particular guide is, in plain English, to describe how to set up
and start IRAF and then how to familiarize yourself with what the heck is going on. I
mostly recommend that you take notes, and I'll try to point out something that is good
to write down until you reach a point where it's memorized. Before we begin, I need to
warn you, dear reader, that, these days, most people use PyRAF, which is a Python
wrapper around IRAF that allows for Python code to be executed with IRAF functions. This
is really cool! I don't really use that, because this all happened after I learned
IRAF and I haven't been bothered to learn how to use PyRAF. So, maybe the way that you'll
learn IRAF here will mostly make you seem like a dinosaur. Just remember, the dinosaurs
ruled for millions of years! They were the dominant life form on the planet for far
longer than us intelligent upright apes.
The Terminal
^ Go to Top
Anyway, the way that you install IRAF on a Mac is generally through Ureka, which should
also install another companion program, ds9. This will install PyRAF, as well, in case
you want to familiarize yourself with that. If you want to run IRAF in the way that I
will describe below, you're going to need to understand that it's run from a terminal,
and not from a cool graphical user interface, like what you see on most programs. This
seems like a charming throwback, but it's actually pretty nice and utilitarian. What
this means is that instead of doing a lot of clicking, you'll be mostly typing and
executing commands. Which is good, since my guide for reducing OSMOS data just lays
out the commands that I use to do things, so you can copy and paste them into your
terminal window, and ideally, if things are set up well, you'll get the same results
as I do.
On a mac, there is a terminal app, but that's not enough for what we need to do, which
is sometimes spawn little graphical windows. For that reason, we need to download
something that will allow us to make an xgterm, which is a special type of graphical
terminal window (hence the "g"). Ureka includes the xgterm program, but we're going to
want to also download something called x11, which will allow us to use xgterm. So, go
and install xquartz, which will then allow you to have xterminals for using IRAF.
I've actually dragged the x11 terminal app to my menu bar because it's The Way that I
Do Anything. A good xterminal window will allow you to run IDL, or PyRAF, or IRAF,
or any number of cool astronomical tools. So, X11. Get it!
Once you install x11, and open it, you'll be presented with a big white box, ready for
you to input commands. Let's learn some very basic commands before we start getting
things ready for running IRAF. Many of these commands, which are Historic, Classic
Linux Commands that have been etched in stone for millenia, will work within IRAF as
well, so it's good to learn them.
The first, and potentially most important command to learn is:
% ls
This command just lists the contents of the folder that you are sitting in. Oh, I should
mention, the way that you should think about using terminals is similar to when you
open up a finder window or a windows explorer window, where you are inside of a folder
on you computer somewhere. Generally, on a mac, the default folder that you go to
when you start a fresh xterm is your home folder:
/Users/yourscreenname
And if you type ls, you'll get the contents of this folder:
  % ls
  Applications            Library             Ureka
  Desktop                 Movies              idl_scripts
  Documents               Music               iraf
  Downloads               Pictures
  Dropbox                 Public
Or whatever weird folders and files you happen to have in your home directory. Now,
let's learn the command that will allow us to move around through the folders (I use
folder and directory interchangeably, sorry) on your computer:
% cd
This command, which stands for "change directory," allows you to go where you want to.
If you just type cd, nothing will happen, since the cd directory has a second part,
which you generally print after you write cd, which is where you want to go. Executing
the command cd by itself is like getting into a taxi at home and saying "Take me home". The driver
will sit there for a second and then just kick you out, and you'll be right where you
started, at home. This is not helpful...unless you happen to be somewhere and want to go
home, since if you type "cd" in any folder on your computer, it will take you to your
home directory, which is nice.
So, let's try this instead:
% cd Desktop
This will tell the computer, open up the Desktop folder and let's go there. And then,
if you type ls:
  % ls
  Apr15_galileo_newton.pptx       j1321.2+0859.fits
  DSCF1282.jpg                    random
  Dartmouth                       solar_system_mini_lecture.pptx
  JSkyCalc.jar                    sw00038079001xpcw3po_cl.evt
  Ureka_correct.terminal          test.reg
  intro_to_IRAF.txt               tex_test
You'll see a bunch of files and folders that are parked on your Desktop. Pretty neat!
Now, if you wanted to go inside the folder "Dartmouth," you'd type:
% cd Dartmouth
Let's say you navigate into the Dartmouth folder, but you want to go back to the
Desktop folder. Well, naively, you'd think, using the taxi metaphor, that you would
just type:
  % cd Desktop
  Desktop: No such file or directory.
Hrm, apparently this Does Not Work. What's going on? Well, "cd" works like this, you
are inside the Dartmouth directory, so all that the shell knows is what folders it
sees inside that directory. And there's no "Desktop" directory inside the Dartmouth
folder. So, it doesn't know what to do, and gives you that message. Well, then let's
teach you two new commands:
% cd ..
This will take you up one folder. So, if you are in the Dartmouth directory, and you type
that, you'll find yourself in the Desktop directory again. And if you typed "cd .." again,
you'll pop up one more directory and be back home. This is because ".." is shell
language for "up one directory." And, if two dots are up one directory, "." is "the
current directory," so you could type:
% cd .
And go nowhere. This is the equivalent to being somewhere, hailing a taxi, and saying
"Take Me Right Here!" You can do this all day and get nowhere and just annoy all the
local taxi drivers.
You can mix and match all of these commands, which is neat. For instance, you could be
in the Dartmouth directory, and type:
% cd ../random
And you'll pop up one directory and then drop down into the "random" directory, one of
the folders on the desktop. You could have also done this by typing:
% cd ../../Desktop/random
Which has two instances of .., meaning go up two folders, but doing this is "redundant" and
"highly silly." Notice that we use forward slashes to separate the different
folders. Anyway, you could be in the Dartmouth folder and do something like this:
% cd ../random/..
But this is really strange since this is saying "I want to go up a directory and into the
random folder and then leave immediately back up a directory." You'd be sitting in the
Desktop directory and you'd have typed too much. If you get lost, you can always type:
% pwd
This command prints the working directory. If I were lost in a folder and typed pwd:
  % pwd
  /Users/yourscreenname/Desktop/random
This command tells me "you're in the random folder, dummy." So, now you can navigate
around.
You can use this, also, to tell cd a very specific directory you want to navigate to,
without having the go from folder to folder:
% cd /Users/yourscreenname/Desktop/random
This command will take you DIRECTLY to the random directory, from anywhere.
If we wanted to make another directory, say, in the home directory, we could use
the Finder on a mac, which is ok, or, in a terminal window we could just type:
  % cd
  % mkdir new_folder
The first command takes us home no matter where we are, and the second command
makes a directory called "new_folder" in the home directory. Go ahead and use "ls"
to see if it's there. Now, there are a few other commands we should learn
before we get into the nitty-gritty of IRAF, as well as some interesting
aspects of the terminal.
First, let's say you want to copy a file. Well, the cp command will
be quite helpful, then:
% cp filename newfilename
Now, if you were to copy a file while you're in a folder to a spot in that
same folder, you'd want to change the name. If you copy it somewhere else, you
can actually show the path to where you want it to go:
% cp filename ../new_folder/filename
Which is nice. Let's say you just want to move the file, though, and not copy it:
% mv filename ../new_folder/
Now, here, you've moved the file to a new folder. But you could also rename it
in the process, using mv:
% mv filename ../new_folder/newfilename
You could even rename a file within the folder you're working in:
% mv filename newfilename
Which is powerful. You can also combine mv and cp with
some of our commands from above:
  % cp ../new_folder/ filename .
  % mv ../new_folder/ filename .
The first command copies a file that's in the folder ../new_folder/
to the folder you're currently in, and the second command just moves the file
entirely.
So, now, there's a few aspects of the terminal that you should know about, too.
First, if you press the tab button while you're typing a file or folder name
(or an aliased command that the terminal knows about, which I'll get into below),
the terminal will attempt to actually complete the name. So, let's say you have
a file called long_file_name_that_you_dont_want_to_type.txt in the directory you're
currently sitting in, and you want to rename it. folder. Well, you could either
type out the full command:
% mv long_file_name_that_you_dont_want_to_type.txt shorter_name.txt
Which is tedious. Or, you could start typing, and press tab early on:
% mv lon
And then, the terminal will look in the current folder for any files that begin
"lon" and then fill out the rest of the file name for any that match, up to
the point where they are different. So, if there's only one file with that long
name, it'll just print:
% mv long_file_name_that_you_dont_want_to_type.txt
But if you happen to have a file that is called "long_file_name_thats_different.txt"
in the same directory, then pressing tab will just result in:
% mv long_file_name_that
Because after that, the two files have different names. If you then typed an
s, and pressed tab again, it would now know which file of the two
you are referring to, and fill out the rest:
% mv long_file_name_thats_different.txt
This is called tab completion, and it works in IRAF, too, but even neater. If you
have multiple files that all start with the same characters as what you've already
typed, you can press tab again and IRAF will show you all of the files that
begin that way, to help narrow it down. This is especially helpful if you are in
a directory with one million files and want to find a specific one.
Also, on that note, you can use ls to help look through directories.
By using the wildcard command * you can say to the terminal, "I want
you to find a file with a specific set of characters somewhere in the filename."
So, for instance, the command ls *.txt would only return files with
names that end with ".txt". And, of course, you can use this command to copy
a bunch of files:
% cp ../*.txt .
This will copy all of the files in the directory above where you are that have
filenames ending with ".txt" to this folder.
Another important set of commands allow you to look at files and their contents
without opening them in an editor. First, there's more, which will
print the contents of a file to the screen:
% more randomfile.txt
If the file is really long, it will just show a little colon symbol at the bottom,
and you can press down to scroll down within the file, and up to scroll back to
the top. You can also press enter to scroll down, and q to quit back
to the command line. You can also print the first lines of a file with head:
% head randomfile.txt
This will print the first ten lines of randomfile.txt. If you wanted to print,
say, the first 32 lines, you would instead type:
% head -32 randomfile.txt
You can also print the last 32 lines with tail:
% tail -32 randomfile.txt
And finally, here's another command that's important, but potentially dangerous. Let's say you
want to delete a file from the command line. Well, you'd want to use rm,
which will remove the file:
% rm randomfile.txt
If randomfile.txt existed at one point, it's gone now. Be careful with rm, since
it doesn't just put things into a recycle bin for later, but deletes the file
fully.
Another important thing is copying and pasting. Well, normally, you'd press
something like command-c and command-v to copy and paste into most windows on
your Mac machine. But with the terminal, it's not as easy. On old Linux machines,
the mouses had three buttons, and the middle button was designed specifically for
pasting text. And, even now, that's how you paste in X11. The problem is, most
computer mice either have one or two buttons these days, so if you want to paste,
you're going to have to find some way to emulate a three button mouse. If you're
using X11, then go into the X11 preferences and check the box that says
"Emulate three button mouse." Now, if you copy text from somewhere, like this
website, you can paste it by holding option and clicking. Try it out!
There are more commands, and we'll be going through them below. But I should
leave you with an important one. I'm always annoyed with the little beep that
sounds often when you do various things in the terminal. To disable the beep,
type:
% xset -b
Whew.
Setting Up IRAF
^ Go to Top
The commands described in the previous section are what you'll need, primarily, to navigate around outside
and inside of IRAF. When I run IRAF, I generally have an "iraf" folder in the home
directory, so I can go there:
  % cd
  % cd iraf/
  % pwd
  /Users/yourscreenname/iraf
  % ls
  login.cl        loginuser.cl    scripts         uparm
This folder has a few items in it. If you already have this folder, great. If not,
go ahead and make your own version of this folder, using mkdir. Now, go inside
this folder. If the folder already exists, look for a file called "login.cl". If
this file doesn't exist, or if you just made the folder, then let's make our
own version of this file by typing:
% mkiraf
This command, if IRAF is installed correctly, will create a "login.cl" file on the
directory you're currently sitting (which, if you've been following along, is the IRAF
folder off your home directory). And that's important, since a login.cl file is vital
for running IRAF from the terminal. You will be asked to enter a terminal type,
after you run mkiraf. I would recommend typing xgterm,
because IRAF needs an xgterm to execute graphical commands. If the login.cl file
already exists, you'll want to open it up and make sure that the file is
setting the terminal type to xgterm. There's a few lines in the file that do
this:
  # Set the terminal type.  We assume the user has defined this correctly
  # when issuing the MKIRAF and no longer key off the unix TERM to set a
  # default.
  if (access (".hushiraf") == no)
      print "setting terminal type to xgterm..."
  stty xgterm
Your login.cl file should say this, and not stty xterm (which stands
for "set terminal type to xterm"). Now, editing
login.cl brings us to an important point. When you work with IRAF, and with many terminal
programs, you're going to want to be able to edit text files. The built in text
editing programs for both the PC and the Mac are pretty stark. In a terminal,
however, you could use one of a couple of neat programs, emacs
and vim. There is
a robust rivalry between these two text editors. When I was young, I used
emacs, since it was pretty straightforward, but
I've since moved on to using a graphical editor, one called TextWrangler. I really
recommend TextWrangler,
but it might be good to learn how to use vim or emacs since in a
pinch, you can use it, and it's especially useful on a machine where there might not
be an option you are familiar with. Pretty much every machine with a terminal will
allow you to use emacs and vim!
So, to edit your login.cl file, you could type:
% emacs login.cl
And it'll open up login.cl for you to edit. You're going to have to navigate around
by using the keyboard (it doesn't allow you to click around on the document), but it
should work like Word does, where you edit by moving the cursor where you want to
insert text, and type. If you want to save your document, you are going to have to
type ctrl-x ctrl-s in succession. If you want to quit, then, you type ctrl-x ctrl-c. There
are so many more things that you can do with emacs, but that's not really what this
guide is about. The internet is chock full of guides for using emacs and vim.
While you're editing your login.cl file, scroll down and change a specific
line in the file to make your life easier. There is a line that says
#set stdimage = and then a set of letters and a number. Make sure
that this says:
set stdimage = imt7
Notice that I've removed the little number sign (I've uncommented it), and I've
changed the value to imt7, which will allow us to view really big
images from within IRAF. Now, save and close login.cl.
Another important thing you are going to have to decide between is the "shell" you are
going to use, which is the weird command structure wrapper that a terminal uses. I
use a shell called "cshell." The default shell on most macs is called "bash." If you
use bash, then this guide will have to be modified, since bash uses some different
shell scripting commands than cshell. It's really up to you, but I'm not going to lie,
if you are completely new to all of this, just use cshell since then the commands
that I teach you here will be useful.
You can learn
about changing shells on a Mac here, but the gist is that you have to do
it from the preferences tab of the built-in Mac Terminal app, and then also
from the terminal itself (using the line chsh -s /bin/tcsh). Go
ahead and change over to cshell, or whichever one you want. However, from
here on out, I'm going to assume you're using cshell. A lot of what I am going
to describe below will be different if you're using bash or another shell, so you'll have to
either look it up online, or find someone who uses the shell you've chosen.
Restart X11 to fully change the shell, and ideally, you should be able to do this:
  % echo $shell
  /bin/csh
...and get that response, indicating that X11 now recognizes your shell as cshell.
Now, navigate to your home directory, and open up a very special file you
should know about, ".cshrc".
  % cd
  % emacs .cshrc
This file, by the way, won't show up if you just type ls in your
home directory, it's hidden. But it's there, and it is a vital file. See, every
command you put into the .cshrc file will be automatically run when you open up
a new x11 terminal window. So, you can put things here that you don't want to keep
typing over and over each time you start up a terminal window. Also, this file
allows you to set up little shortcuts for executing files, which is a really helpful
time saver.
We are going to want to put a few things into this file:
  alias ds9 /Users/yourusername/Ureka/bin/ds9
  alias xgterm /Users/yourusername/Ureka/bin/xgterm
Now, don't just copy these lines in. What these lines are doing is telling the
shell that when you type ds9, you actually mean
/Users/yourusername/Ureka/bin/ds9. On my computer, this is where
ds9 is located, so you're going to want to find where ds9 is on your own computer.
Presumably, if you installed Ureka, it also installed right off of your home
directory, so you can then find ds9 there (Here's a way you can do it, navigate
to your home directory, and then try ls Ureka/bin/ds9. If the
file exists, it will print out the path to the file. If it doesn't, you're going
to have to go hunting. You should do the same thing for the second line.
Now, if you installed Ureka, there should be some other lines in the .cshrc file,
and indeed, you may have noticed them in there when you opened the file to begin
with:
  alias ur_setup 'eval `/Users/yourusername/.ureka/ur_setup -csh \!*`'
  alias ur_forget 'eval `/Users/yourusername/.ureka/ur_forget -csh \!*`'
These are lines that Ureka put in there so that you can set up IRAF when you start
up a terminal. The thing is, you might not want to type "ur_setup" every time
you start a terminal and want to get everything set up for IRAF. So, you can then
just add the line:
ur_setup
...to your .cshrc file, and every time you start up a terminal, it will
automatically run that line and get everything set up for you. That's all I
think we'll need to do with the .cshrc file for running IRAF, so save and quit
the file. Now, whenever you edit the .cshrc file, you have to tell the terminal
to pay attention to the changes you just made, and to do this you type:
% source .cshrc
And now the terminal knows about all of your new changes to .cshrc. Awesome! The
more that you write code and work with the terminal, the more you'll probably
come back to the .cshrc file.
Now we need to do one more thing, and that's edit another file, which is called
loginuser.cl. Go to the IRAF directory, and create a file called loginuser.cl,
which you can do with emacs:
  % cd
  % cd iraf/
  % emacs loginuser.cl
If you don't already have this file, you're going to be faced with a large
blank file. The loginuser.cl file is kind of like the .cshrc file, but for
IRAF. It sets things up when you start up, and is great for pointing IRAF
at user defined programs. It's also good for opening commonly used packages
when you start up IRAF. If you're going to be constantly reducing spectroscopic
data, you might want to have these lines in your loginuser.cl file:
  noao
  onedspec
  twodspec
  longslit
  stsdas
  imgtools
  digiphot
  apphot

  keep
Which opens up a bunch of packages, essentially setting the table for you when you
start IRAF. The last line, keep is the most important line, since it
tells IRAF that you want it to execute and remember everything you've put into
this file when you start IRAF. So, we'll be coming back to this as we work on
reducing data with IRAF, but if you have those lines above in the loginuser.cl
file you should be fine.
Oh, if you were to go into the login.cl file, now, you could actually scroll
down and see this:
  if (access ("home$loginuser.cl"))
      cl < "home$loginuser.cl"
  ;
  keep
This is where IRAF learns where the loginuser.cl file is and executes it. Note that
the "home" directory for IRAF is different than your own home directory, as also
mentioned in login.cl:
set home = "/Users/yourusername/iraf/"
The words cl < "home$loginuser.cl" is the way that you can execute
scripts in IRAF, too, which is nice to know, and will come up when we reduce
data.
Using IRAF
^ Go to Top
So, now that we have everything set up, and we have some familiarity with
the terminal, it's time to actually run IRAF, and learn how things work. Open
up an xgterm. Generally, you do this by just typing:
% xgterm
...from within an X11 terminal window. I actually like to run the command like this:
% xgterm -sb &
What this does is is opens an xgterm window with a scroll bar (which is helpful), and
if also allows you to execute more commands in the terminal window that you just
used to launch the xgterm. It's really up to you!
Now, inside of the xgterm, navigate to your iraf folder, and then start up
ds9:
% ds9 &
Remember, above we set an alias for ds9 so that if you type this command, your shell
knows what program you want to open. Hopefully, depending on how fast your computer
is, the ds9 window will open up. Move it aside, and go back to the xgterm. Here,
open up IRAF:
% cl
Text will scroll by on the screen welcoming you to IRAF, and then a series of
packages will be shown. Also, your prompt has changed from a percent sign to a
greater than symbol. You can now use many of the IRAF commands we've talked about,
including ls, cd, pwd, and mkdir.
There are a few things that are not allowed. The remove command rm
will give you an error:
  > rm randomfilename.txt
  ERROR: ambiguous task `rm'
And so, if you want to execute a shell command that IRAF doesn't recognize, you're
going to have to type an exclamation point beforehand. So, for rm:
> !rm randomfilename.txt
And randomfilename.txt is gone. You can also just use the program imdel
to delete images:
> imdel randomimage.fits
Try not to use more in IRAF,
since it will sometimes start highlighting everything, and well, I'd just
read up on cat, which works in a similar way if you just use it
on a file you want to take a look at.
Now, IRAF works by opening up packages and then running programs within those
packages. So, if you wanted to run apall, an IRAF program that
extracts apertures from two dimensional spectra, and you knew it was in the
apextract package, which is in the twodspec package,
which is in the noao package (usually written as
noao.twodspec.apextract, by the way), you'd type:
  > noao
        artdata.      digiphot.     nobsolete.    onedspec.
        astcat.       focas.        nproto.       rv.
        astrometry.   imred.        observatory   surfphot.
        astutil.      mtlocal.      obsutil.      twodspec.

  > twodspec
        apextract.  longslit.

  > apextract
        apall         apedit        apflatten     apnormalize   apscatter
        apdefault@    apfind        apmask        aprecenter    apsum
        apdemos.      apfit         apnoise       apresize      aptrace
And now, if you typed apall, IRAF would know what you were
referring to. Each time you open a package, it will show all of the
packages and programs that are contained in there, which is what all of the
text printed to screen is. You can leave a package (which is largely
unnecessary, but in case you want to) by typing bye. So, if I
opened the packages like I did above, and then wanted to leave the apextract
package, I'd type:
  > bye
        apextract.  longslit.
And notice, it puts you back into the twodspec package, and shows you the contents there.
Again, you can open packages all over the place, and they'll stay open, it's not like
going into and out of folders. If you want to figure out what package
a certain task belongs to, you can type:
  > which apall
  apextract
  > which apextract
  twodspec
  > which twodspec
  noao
etc. etc. This is helpful from time to time!
In IRAF, you can run things in two ways. In one way, you go into the parameters file for
a task, and then edit those parameters, and then run the program, and in the other, you
just set all of the parameters from the command line, and execute programs that way.
To be honest, IRAF is a real mess of parameters, and interconnected programs that rely
on each other, and so it can be pretty annoying to use. I kind of go back and forth between
the two methods of running programs, but I really recommend doing everything from the
command line so that you can make sure to keep track of what parameters are set, and
what they are set to. In my guide to OSMOS
data reduction, I try really hard to give the commands you would execute to run
the programs, but I'll also teach you here how you might go about running a program
by editing the parameters directly.
So, now, at the top of this page you probably saw a button that allowed you to download
some sample files to play with. Go ahead and unpack those files, and navigate to
a folder containing those files. You'll see a file called image.fits, which is an
image of a random field taken with the OSMOS imager at MDM. We're going to play with
that for a bit.
The first thing you might want to do is display the image. Well, within IRAF,
providing you've opened up ds9, you can type:
> display image.fits
You can actually type displ image.fits to save some typing, if you
want. If IRAF and ds9 aren't playing well, then you'll get an error message
similar to this one:
ERROR: Cannot open device (node!imtool,,8192,8192)
This means you should log out of IRAF, and open up a ds9 window within the
IRAF folder from the xgterm you're using:
  > logout
  % ds9 &
  % cl
Notice that typing logout allows you to log out of IRAF. Pretty important.
Now, if you navigate back to the folder with image.fits, you can display it as I
did above. So, here, you're running the display program from the
command line. But you could run it from the parameters file, by typing:
                                                                     I R A F
                                                       Image Reduction and Analysis Facility
  PACKAGE = tv
     TASK = display

  image   =           image.fits  image to be displayed
  frame   =                    1  frame to be written into
  (bpmask =                  BPM) bad pixel mask
  (bpdispl=                 none) bad pixel display (none|overlay|interpolate)
  (bpcolor=                  red) bad pixel colors
  (overlay=                     ) overlay mask
  (ocolors=                green) overlay colors
  (erase  =                  yes) erase frame
  (border_=                   no) erase unfilled area of window
  (select_=                  yes) display frame being loaded
  (repeat =                   no) repeat previous display parameters
  (fill   =                   no) scale image to fit display window
  (zscale =                  yes) display range of greylevels near median
  (contras=                 0.25) contrast adjustment for zscale algorithm
  (zrange =                  yes) display full image intensity range
  (zmask  =                     ) sample mask
  (nsample=                 1000) maximum number of sample pixels to use
  (xcenter=                  0.5) display window horizontal center
  (ycenter=                  0.5) display window vertical center
  (xsize  =                   1.) display window horizontal size
  (ysize  =                   1.) display window vertical size
  (xmag   =                   1.) display window horizontal magnification
  (ymag   =                   1.) display window vertical magnification
  (order  =                    0) spatial interpolator order (0=replicate, 1=linear)
  (z1     =                     ) minimum greylevel to be displayed
  (z2     =                     ) maximum greylevel to be displayed
  (ztrans =               linear) greylevel transformation (linear|log|none|user)
  (lutfile=                     ) file containing user defined look up table
  (mode   =                   ql)
So, now, if you move the cursor up and down, you'll go from one parameter to
the next. You can start typing when your cursor is over one of the parameters
to start typing it in. If you make a typo on a parameters file, you can't just
press backspace or delete. On a Mac, you have to press "fn-delete" which will
actually serve as a backspace. You could also just press up or down to move
to another parameter, and then move the cursor back to the parameter with the
typo and try again. Editing the parameters like this is tedious, which is yet
another reason why you'd want to do things from the command line.
To get out of the parameters file, you have to type ctrl-d, which
will exit and save your changes. You can also type ctrl-c to
exit and reject your changes. In the parameters file, you can run the program
by typing :go. This is a very tedious way to run programs, right?
There are a whole bunch of individual IRAF programs that you can read up on
by typing help PROGRAMNAME. Like, for instance, if you wanted to
read about what all of the parameters were for display, you'd type:
> help display
And you'd be taken to the manual for display. Here, notice at the
bottom of the screen:
[q=quit,d=downhalf,f|sp=downfull,j|cr=downline,N=next]
This is telling you how to navigate the help page, by typing q to
quit, d to move halfway down a page, f to move fully
down a page, j to move down a line, and I'm not quite sure what
N does. Maybe someone can tell me, and I'll update the site here.
So, now, there are a few important IRAF programs that you should know about:
display - We covered this a bit above, but this is the program that
you'll use often to look at images and two-dimensional spectra.
imarith - This program allows you to mess with an image using
arithmetic. You can add, subtract, multiply, divide (and other operations) images
with numbers as well as other images. For instance, you can divide all of the counts
in an image by 5:
> imarith image.fits / 5 image_div_five.fits
Now there will be a new image called "image_div_five.fits" which is exactly
the same but every pixel has its counts divided by five. The program imarith
is pretty robust and helpful, so I would go and read the help file.
splot - This program is the primary method to view spectra, similar
to how display allows you to view images. If you're going to do
any spectroscopy, you're going to want to learn how to use splot, as
it allows for both viewing and fitting spectral features.
imexamine - This program works in conjunction with an image displayed
in IRAF to find important details about image features. For instance, you can
use imexamine to find the centers of stars, or get an estimate for
how bright they are or their stellar profiles. It's well worth your time to
fiddle around with imexamine, since this program is the quickest
way to get an understanding of the properties of objects in your image.
imhead - This program shows you the image header, so you
can look at the various properties of the image. If you use it like this:
> imhead image.fits l+
You'll see the whole image header, which is good for finding out things like when
the image was taken, and of what object, and at what airmass.
Using ds9
^ Go to Top
Now, learning IRAF also requires a pretty good understanding of ds9, the program
that works in conjunction with IRAF to display images. Because it's a graphical
program, it is navigated with the mouse, primarily, and it's a little more
straightforward than just using IRAF. That being said, there are some aspects
that you should be aware of.
First, let's take a look at the interface. I've displayed an image through ds9:
 At the top is the menu, which is replicated with a series of buttons right above
the image. If you click on any of those, you'll be presented with a series of
options. You can open files with
At the top is the menu, which is replicated with a series of buttons right above
the image. If you click on any of those, you'll be presented with a series of
options. You can open files with 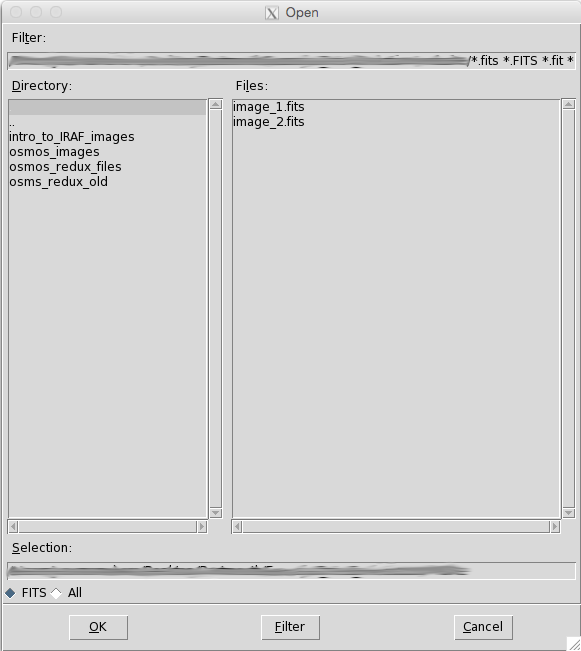 Notice, on the left it shows the various directories, and on the right it shows
the files within the directories that you click. If you click
Notice, on the left it shows the various directories, and on the right it shows
the files within the directories that you click. If you click
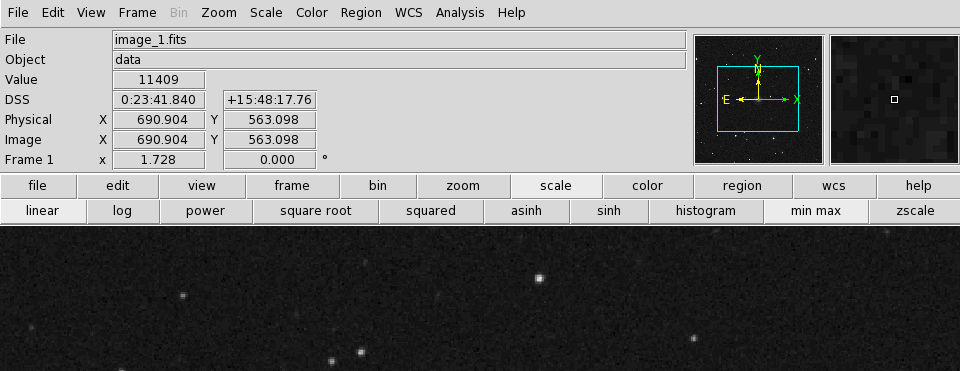 So, first, let's look at what we have. If you mouse over the image, a bunch of
information will be shown in the top left. At the top you see the file name,
and below that, the name of what whatever object the image or spectra is focusing on,
as taken from the image header. Below that you have the number of counts at the
pixel that your mouse is currently hovering over. If you display an image through
IRAF, sometimes this value will max out, which is another fun quirk of the IRAF
display command. Below this is the WCS field, which shows the RA and DEC of where
you are pointing, or the wavelength (if you're looking at a two-dimensional spectrum),
but only if the image has an associated "world coordinate solution", which has
to be put into an image manually. Some images you download from large surveys
will have WCS information built in, which is nice. Below this you will find
the Physical and Image coordinates of your mouse pointer. In practice, the Image
coordinates refer to the pixel values of the image where the left, bottom of
the image is (0,0), while the Physical coordinates will remember if this image
was cut from a larger image, and so the pixels might actually have been at a
different location compared to the left or bottom than they used to be. It's a
little confusing, but you'll get it as you fumble with ds9 more. Below the
pixel coordinates you'll find the amount by which you are zoomed in on
the image, and the current rotation of the image, in degrees.
You can zoom in and out of an image by either scrolling up and down if your mouse
has that functionality, or by clicking the menu option
So, first, let's look at what we have. If you mouse over the image, a bunch of
information will be shown in the top left. At the top you see the file name,
and below that, the name of what whatever object the image or spectra is focusing on,
as taken from the image header. Below that you have the number of counts at the
pixel that your mouse is currently hovering over. If you display an image through
IRAF, sometimes this value will max out, which is another fun quirk of the IRAF
display command. Below this is the WCS field, which shows the RA and DEC of where
you are pointing, or the wavelength (if you're looking at a two-dimensional spectrum),
but only if the image has an associated "world coordinate solution", which has
to be put into an image manually. Some images you download from large surveys
will have WCS information built in, which is nice. Below this you will find
the Physical and Image coordinates of your mouse pointer. In practice, the Image
coordinates refer to the pixel values of the image where the left, bottom of
the image is (0,0), while the Physical coordinates will remember if this image
was cut from a larger image, and so the pixels might actually have been at a
different location compared to the left or bottom than they used to be. It's a
little confusing, but you'll get it as you fumble with ds9 more. Below the
pixel coordinates you'll find the amount by which you are zoomed in on
the image, and the current rotation of the image, in degrees.
You can zoom in and out of an image by either scrolling up and down if your mouse
has that functionality, or by clicking the menu option
At the top is the menu, which is replicated with a series of buttons right above
the image. If you click on any of those, you'll be presented with a series of
options. You can open files with File-->Open:
Notice, on the left it shows the various directories, and on the right it shows
the files within the directories that you click. If you click .. you
go up a folder. At the top there is a box where, if you look at the whole line,
you can see that it's only showing files it can display, which are variants on
.fits or .fit files. You can also click on the radio button for "All" at the bottom
to show all of the images in a folder for display, but be warned, ds9 can't handle
all image files, like bad pixel masks have to be viewed through IRAF. At the bottom,
it shows the pathway and the most recent image that's been displayed, if one has
been displayed.
Looking at an Image
So, first, let's look at what we have. If you mouse over the image, a bunch of
information will be shown in the top left. At the top you see the file name,
and below that, the name of what whatever object the image or spectra is focusing on,
as taken from the image header. Below that you have the number of counts at the
pixel that your mouse is currently hovering over. If you display an image through
IRAF, sometimes this value will max out, which is another fun quirk of the IRAF
display command. Below this is the WCS field, which shows the RA and DEC of where
you are pointing, or the wavelength (if you're looking at a two-dimensional spectrum),
but only if the image has an associated "world coordinate solution", which has
to be put into an image manually. Some images you download from large surveys
will have WCS information built in, which is nice. Below this you will find
the Physical and Image coordinates of your mouse pointer. In practice, the Image
coordinates refer to the pixel values of the image where the left, bottom of
the image is (0,0), while the Physical coordinates will remember if this image
was cut from a larger image, and so the pixels might actually have been at a
different location compared to the left or bottom than they used to be. It's a
little confusing, but you'll get it as you fumble with ds9 more. Below the
pixel coordinates you'll find the amount by which you are zoomed in on
the image, and the current rotation of the image, in degrees.
You can zoom in and out of an image by either scrolling up and down if your mouse
has that functionality, or by clicking the menu option Zoom -->
Zoom In / Zoom Out or by clicking the Zoom Button and then
clicking the + or - buttons. Actually, let me just say
that a lot of what you can do you can do from the menu or using the buttons, so
I'll stop repeating myself, except in cases where you can only do something from
either the menu or the buttons, but not both. For instance, you can do quite a few
interesting things from the Zoom menu, like invert the X or Y axes (or both!),
rotate the image, and even open up the Pan Zoom Rotate Parameters,
which will let you zoom or rotate the image by some manual amount.
Up in the top right corner you'll see two boxes. The left box shows the entire
image, with some arrows indicating the direction of the X and Y coordinate system.
If the image has a built in "world coordinate system," it will often show the directions
indicating North and East. If you are zoomed in enough on the image, it will show
a box indicating the current section of the full image you are focused on. You can drag
that box around on the image to go to different places in the image. On the right
is one of my favorite aspects of ds9, a box that show a zoom-in on the area of
the image you are hovering over. This is really helpful when you're wanting to
focus on a very specific part of an image.
A few important things about moving around in ds9. You primarily use the mouse to
click on things in the image, but you can also place your mouse over the image and
then press left, right, up, or down to move the mouse in tiny incremental steps,
which is often really helpful for putting the mouse on an exact spot in an image.
Also, if you hold option and click on an image, the image will move to center on that spot.
As a result, you can focus on individual objects you care about really easily.
Changing the Scale of Images
Now, you may have noticed that the image doesn't look spectacularly interesting
when you first loaded it into ds9. We should probably talk about making images
look the way you want them to. You can change the brightness and contrast of an
image by right-clicking, holding that down, and then moving your
mouse up, down, right or left. This is really helpful for viewing
various features in an image, and you should practice this. More importantly, however
for viewing images is the absolute scale that they are displayed in. If you click
the  Sometimes, astronomical images and two-dimensional spectra can have a huge
range in counts, which makes it hard to see really bright things and also very
faint features. These scaling options will help you to better see the features
in an image. The
Sometimes, astronomical images and two-dimensional spectra can have a huge
range in counts, which makes it hard to see really bright things and also very
faint features. These scaling options will help you to better see the features
in an image. The
Scale button you'll be presented with some options:
Sometimes, astronomical images and two-dimensional spectra can have a huge
range in counts, which makes it hard to see really bright things and also very
faint features. These scaling options will help you to better see the features
in an image. The linear button shows the counts as is, while the log
button shows the logarithm of the counts. Often, what you'll want to do is
click on a button, like log, and then right-click to fumble around
with the image brightness and contrast until it looks like what you want. Go
ahead and try this out with image.fits.
The two buttons on the far right operate a little differently, as they set
the global parameters. The min max button will show everything, from
the minimum pixel to the maximum pixel, but the zscale works some
algorithmic magic and shows a range that actually works most of the time. If you
open an image through IRAF in ds9, it will automatically use zscale
to display the image, and if you fumble around with the scale buttons, it
might actually affect how the image is displayed, so I'd just trust what IRAF
does, or just open the image directly through ds9.
You can also click Scale --> Scale Parameters to see a
histogram with some limits that you can either drag, or change by hand, which
will allow you to change the stretch of the image manually. Sometimes, in images
with a huge amount of range, this is really helpful. When I display HST images,
I have to really drag the bars in the histogram quite a bit just to see what
I care about.
Frames and Aligning Images
So, now that you can play around with an individual image successfully, let's
really show you what ds9 can do. First, you can click  If you open another image in that second frame, now you can go back and forth
between them by either clicking the
If you open another image in that second frame, now you can go back and forth
between them by either clicking the  Now, both of the images that I've provided have a world coordinate solution, so
if you mouse over them, you'll find that you can see the position in the sky (the
RA and DEC values, represented by an alpha and a delta) for any spot in either image.
One of the key things about IRAF is that you can align both images based on
either pixel or sky coordinates. Display just one image, like, say, image one,
and focus on that galaxy there. Zoom in real good, and then click
Now, both of the images that I've provided have a world coordinate solution, so
if you mouse over them, you'll find that you can see the position in the sky (the
RA and DEC values, represented by an alpha and a delta) for any spot in either image.
One of the key things about IRAF is that you can align both images based on
either pixel or sky coordinates. Display just one image, like, say, image one,
and focus on that galaxy there. Zoom in real good, and then click 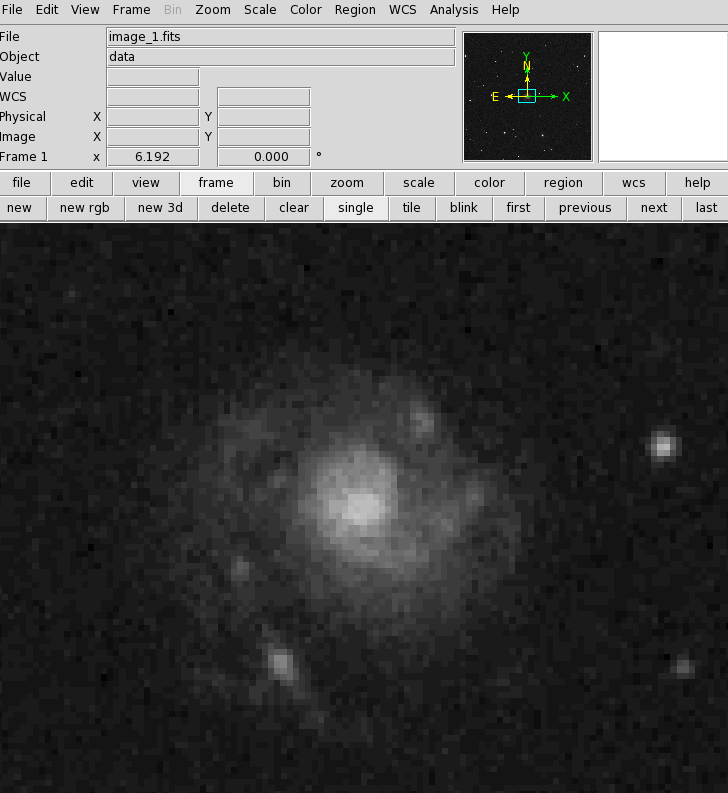 Pretty neat, huh? You can also align things based on Physical or Image coordinates,
which can also be helpful.
Pretty neat, huh? You can also align things based on Physical or Image coordinates,
which can also be helpful.
Frame -->
New Frame or the Frame and then New buttons
to open up another frame, which you can think of like another tab in a browser.
Notice that the Frame number is displayed near the top of ds9.
If you open another image in that second frame, now you can go back and forth
between them by either clicking the Frame and then Next
or Previous buttons, or just pressing Tab, which is infinitely
easier. You can automate going back and forth between two images by clicking
the Blink button, and you can show multiple frames by clicking the
Tile button. It's sometimes really great to back and forth between
two images, especially if they're properly aligned (which we will get to), because
you can see features that change between the two images really easily, then.
Here, I've displayed image_1.fits and image_2.fits in frames 1 and 2, and you
can see that they are two different images of the same object,
NGC 99.
Now, both of the images that I've provided have a world coordinate solution, so
if you mouse over them, you'll find that you can see the position in the sky (the
RA and DEC values, represented by an alpha and a delta) for any spot in either image.
One of the key things about IRAF is that you can align both images based on
either pixel or sky coordinates. Display just one image, like, say, image one,
and focus on that galaxy there. Zoom in real good, and then click Frame
--> Match --> Frame --> WCS. This will
take any other frame that you have open and align everything to what is visible,
so if you click tab, or blink between the images, they'll be all lined up:
Pretty neat, huh? You can also align things based on Physical or Image coordinates,
which can also be helpful.
Regions Files
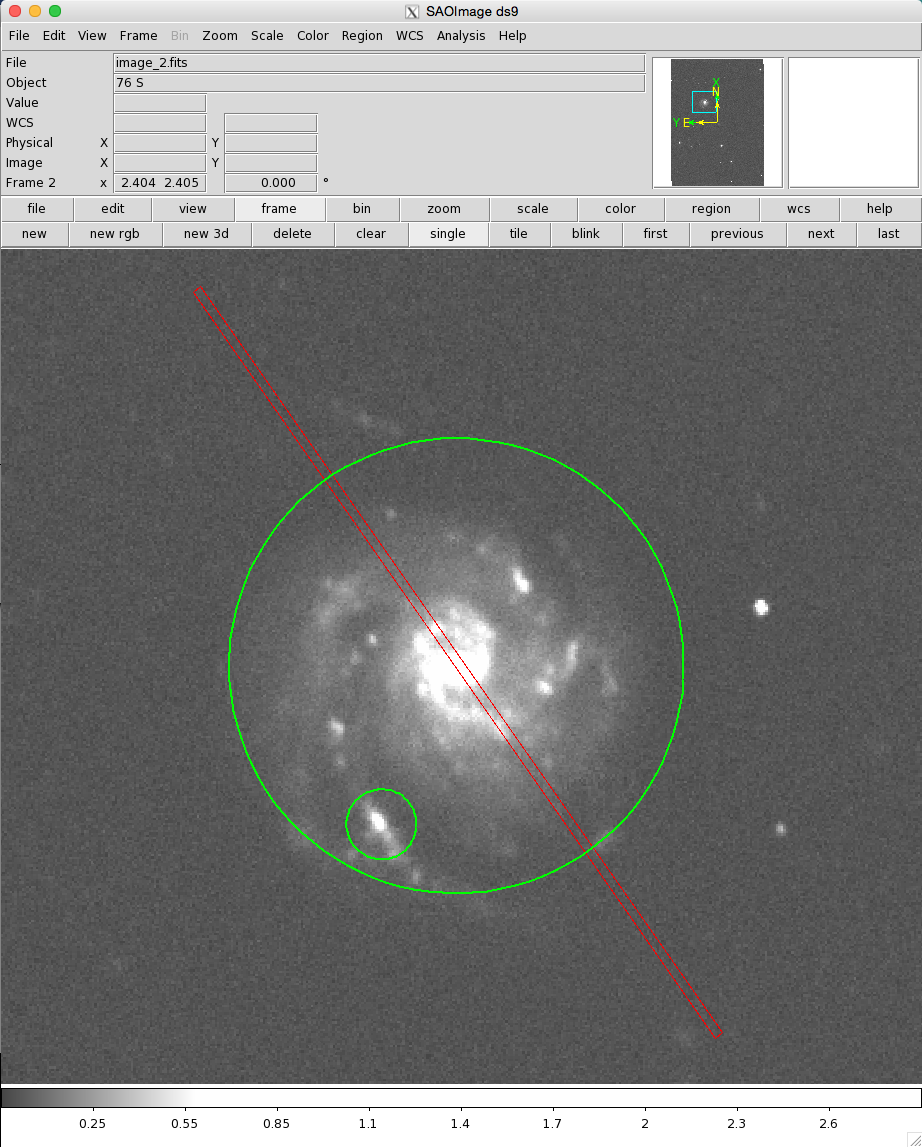
There's one more thing that is helpful, which is that you can create regions
files to help mark up your image. If you click on your image normally, you'll
see a little circle gets created where you click. If you click it again, little
boxes will appear at the corners, and you can drag them to change the size of the
circle. If it's highlighted like this, you can press the delete key on your keyboard
to delete the circle. If you double click on the circle, a box will appear
that allows you to more fine tune the circle's parameters, like it's position and
radius. When you first do this with image_1.fits or image_2.fits, the position
and radius are in physical, on-the-sky coordinates, and if you click the box
to the right of either the Center or Radius values, you can change which
coordinate system you want to refer to. Go ahead and see if you can show the
radius of your circle in arcseconds (click the box to the right of the value
for the radius, and then click on 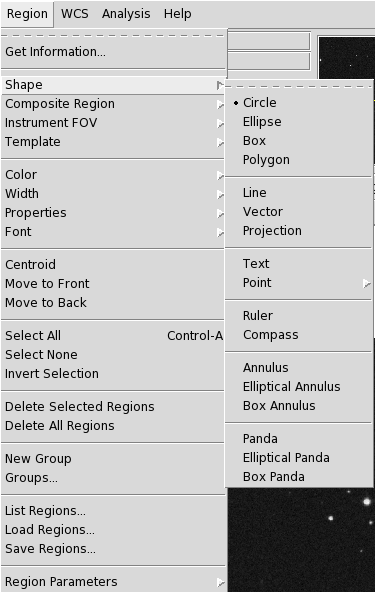 You can make ellipses, boxes, and strange-shaped polygons. You can even make
lines, spawn a ruler which will tell you the distance between points in an image,
and even
You can make ellipses, boxes, and strange-shaped polygons. You can even make
lines, spawn a ruler which will tell you the distance between points in an image,
and even 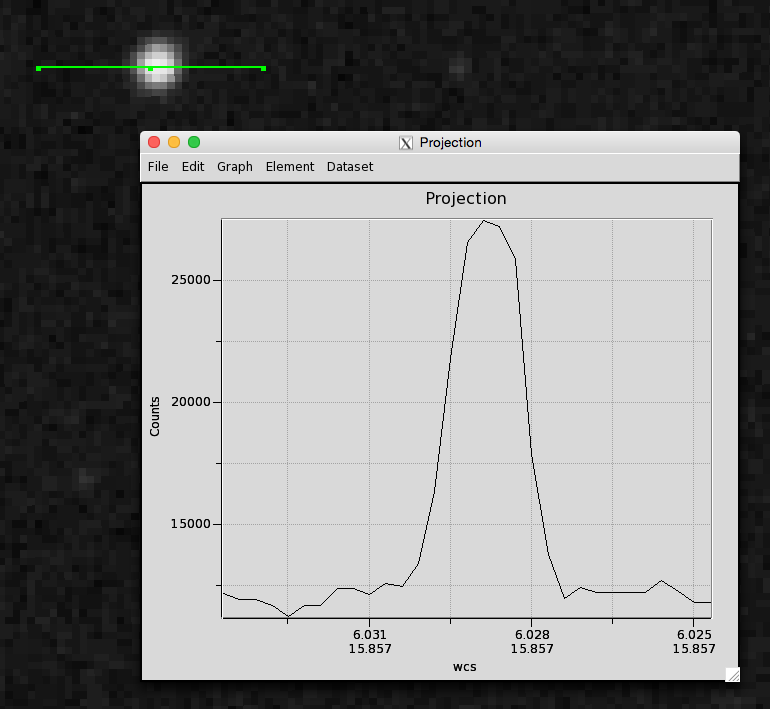 One interesting aspect of adding regions to an image is that you can save those
regions to a file that can be loaded later, or on another image. So, for instance,
if I go and create these regions:
One interesting aspect of adding regions to an image is that you can save those
regions to a file that can be loaded later, or on another image. So, for instance,
if I go and create these regions:
 I can then save these to a file by clicking the menu item
 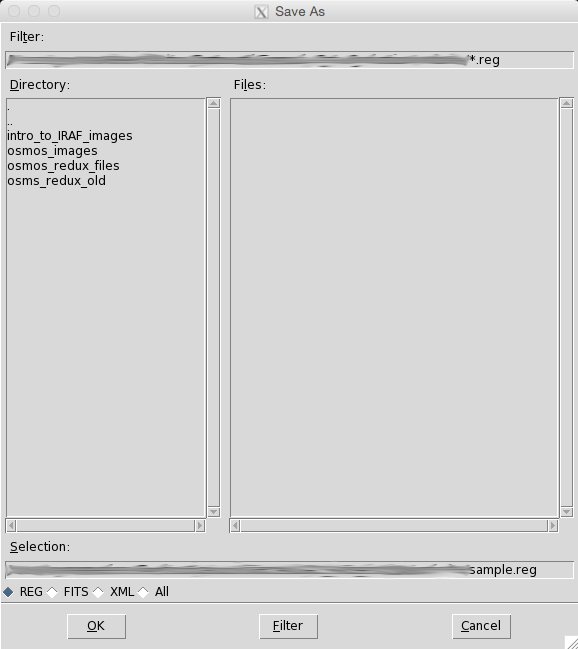 Here you would want to change the default name from ds9.reg to anything you want.
I have elected to call the regions file "sample.reg," and then I clicked
Here you would want to change the default name from ds9.reg to anything you want.
I have elected to call the regions file "sample.reg," and then I clicked 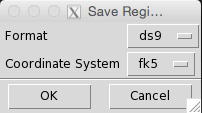 This box asks about the format of the regions file that you want, and I selected
a ds9 format, and then the coordinate system. I want this to output values in
terms of RA and DEC, so I chose fk5. Now, a new regions file is indeed saved, and if I
open it up, I get this:
This box asks about the format of the regions file that you want, and I selected
a ds9 format, and then the coordinate system. I want this to output values in
terms of RA and DEC, so I chose fk5. Now, a new regions file is indeed saved, and if I
open it up, I get this:
 It's sometimes really helpful to be able to do this, especially if you want
to highlight features seen in one image in another. Also, because a regions file
is just a text file, you can create your own outside of ds9, an then load them
in. This is neat if you know there's an object at a certain position in the sky
and you have a huge image and want to find it easily. If you want to delete all
the regions currently shown in an image (this will not delete regions files,
so don't worry), you'd click
It's sometimes really helpful to be able to do this, especially if you want
to highlight features seen in one image in another. Also, because a regions file
is just a text file, you can create your own outside of ds9, an then load them
in. This is neat if you know there's an object at a certain position in the sky
and you have a huge image and want to find it easily. If you want to delete all
the regions currently shown in an image (this will not delete regions files,
so don't worry), you'd click
ArcSec). You can even change the
color of the box, or how thick it is.
This box is a "region," and you can have quite a few different types of regions
if you want. If you click the menu item Region --> Shape:
You can make ellipses, boxes, and strange-shaped polygons. You can even make
lines, spawn a ruler which will tell you the distance between points in an image,
and even Projection which shows the profile of a cut through the
image in a little box that pops up. Projection is really helpful
for looking at spectra really quickly, or even stellar profiles on the fly:
One interesting aspect of adding regions to an image is that you can save those
regions to a file that can be loaded later, or on another image. So, for instance,
if I go and create these regions:
I can then save these to a file by clicking the menu item Regions -->
Save Regions, which will open up a box:
Here you would want to change the default name from ds9.reg to anything you want.
I have elected to call the regions file "sample.reg," and then I clicked OK,
which prompts another box to pop up:
This box asks about the format of the regions file that you want, and I selected
a ds9 format, and then the coordinate system. I want this to output values in
terms of RA and DEC, so I chose fk5. Now, a new regions file is indeed saved, and if I
open it up, I get this:
  # Region file format: DS9 version 4.1
  # Filename: path_to_image/image_1.fits
  global color=green dashlist=8 3 width=1 font="helvetica 10 normal roman" select=1 highlite=1 dash=0 fixed=0 edit=1 move=1 delete=1 include=1 source=1
  fk5
  circle(0:23:59.434,+15:46:14.07,37.4343") # width=2
  circle(0:24:00.289,+15:45:48.00,5.7648") # width=2
  box(0:23:59.417,+15:46:14.61,1.5",150",35) # color=red
The first two lines are comments, but the next line indicates the default
parameters for the regions. The next line is the coordinate system, and then
the various regions files are given. As you can see, for circles, the RA
and DEC of the center are given, followed by the radius of the circle in terms
of arcseconds. For boxes, the center of the box, as well as the width, height,
and angle are given, and as you can see, a new color is indicated afterwards.
If you then went back to ds9, moved over to image_2.fits, and clicked Regions -->
Load Regions, you could load in sample.reg, and, because image_2.fits
also has a world coordinate solution, you'd then get the same regions appear:
It's sometimes really helpful to be able to do this, especially if you want
to highlight features seen in one image in another. Also, because a regions file
is just a text file, you can create your own outside of ds9, an then load them
in. This is neat if you know there's an object at a certain position in the sky
and you have a huge image and want to find it easily. If you want to delete all
the regions currently shown in an image (this will not delete regions files,
so don't worry), you'd click Regions --> Delete All Regions.
IRAF Splot
^ Go to Top
One of the IRAF programs that is most important for looking at and analyzing
spectra is 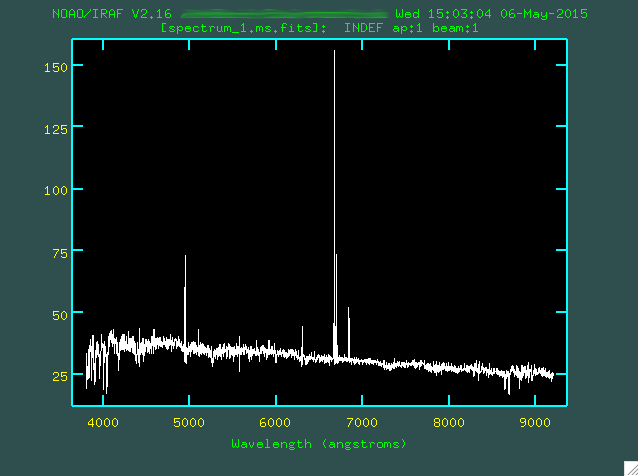 If you move the mouse around, you'll find that it is accompanied by a big
red crosshair, which is helpful, especially for estimating the wavelengths of
spectral features. Along the bottom axis is the wavelength, often given in
terms of Angstroms, or pixels, if a wavelength solution has not been applied
to the one-dimensional spectrum. Along the left axis is the flux, which in
this case is given in terms of f_lambda units of 10^-17 erg/s/cm^2/Angstrom,
which is how it was downloaded from the SDSS servers.
The first thing you might want to do is zoom in and out of the spectrum to
better focus on a section of interest. To do this, you'll want to type
If you move the mouse around, you'll find that it is accompanied by a big
red crosshair, which is helpful, especially for estimating the wavelengths of
spectral features. Along the bottom axis is the wavelength, often given in
terms of Angstroms, or pixels, if a wavelength solution has not been applied
to the one-dimensional spectrum. Along the left axis is the flux, which in
this case is given in terms of f_lambda units of 10^-17 erg/s/cm^2/Angstrom,
which is how it was downloaded from the SDSS servers.
The first thing you might want to do is zoom in and out of the spectrum to
better focus on a section of interest. To do this, you'll want to type  And then we'd type
 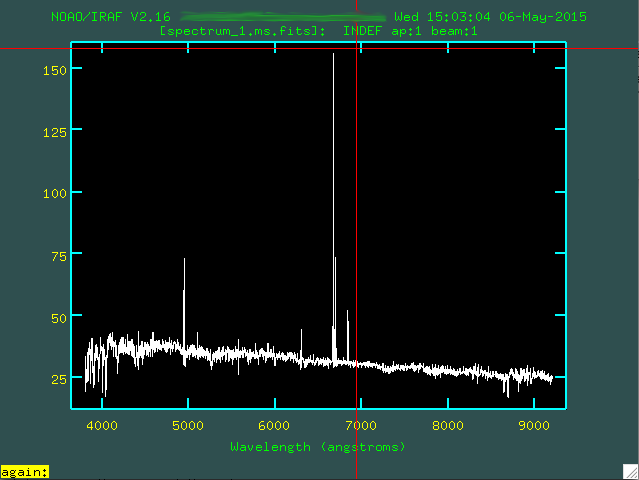 And then we'd type
 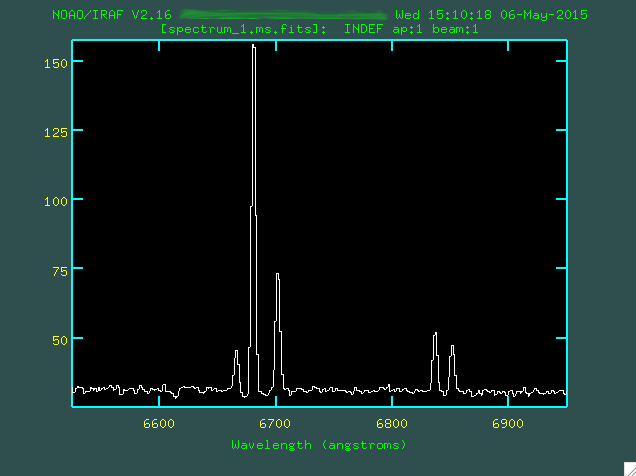 Pretty neat! If we wanted to zoom back out, we'd type
 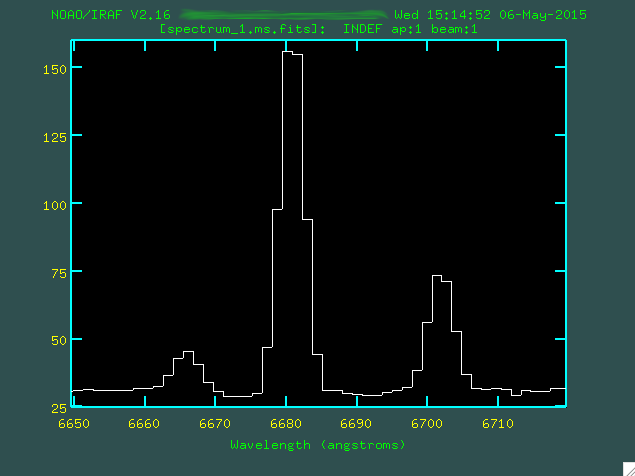 Here, we can see three emission lines. If we wanted, we could put the mouse
over one of the lines, and press the space bar:
Here, we can see three emission lines. If we wanted, we could put the mouse
over one of the lines, and press the space bar:
 In yellow, you can see the wavelength of the cross hair, the flux at the cross
hair position, and the flux of the spectrum at that wavelength. This is a
pretty useful bit of information!
We can actually look at some statistics from sections of a spectrum
using
In yellow, you can see the wavelength of the cross hair, the flux at the cross
hair position, and the flux of the spectrum at that wavelength. This is a
pretty useful bit of information!
We can actually look at some statistics from sections of a spectrum
using 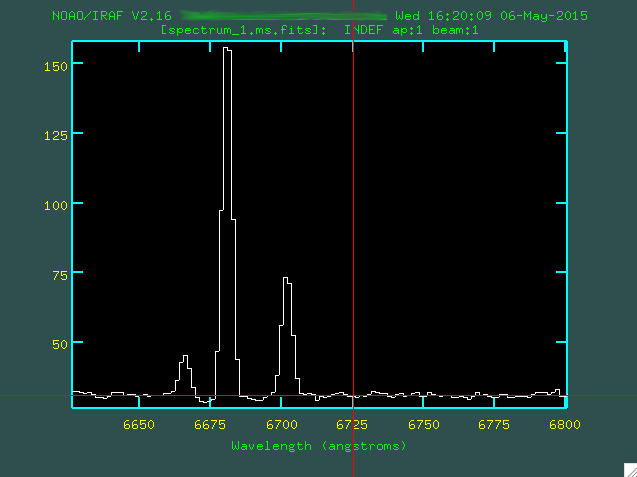 ...and then another section a little ways away and type
  ...another box will appear showing some information about this section
of the spectrum:
...another box will appear showing some information about this section
of the spectrum:
 This is the average value of the flux in this range, as well as the rms of
the flux, and the signal-to-noise ratio. This allows you to get a good idea
of what the noise is, so what the flux would have to be of a line to be
detected.
Another important aspect of
This is the average value of the flux in this range, as well as the rms of
the flux, and the signal-to-noise ratio. This allows you to get a good idea
of what the noise is, so what the flux would have to be of a line to be
detected.
Another important aspect of 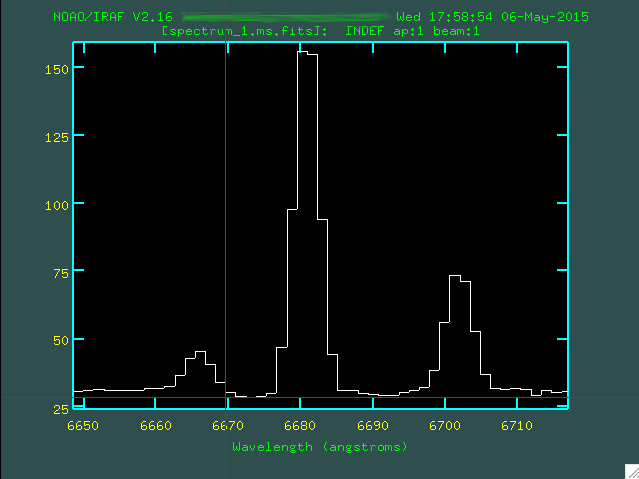
 Here, the centroid, the flux, the equivalent width, and the Gaussian
FWHM are fit and printed to the screen for the emission line. Notice also
that it fits the background between the two places you pinned the fit, so it
only shows the flux in the emission line. If you instead
type
Here, the centroid, the flux, the equivalent width, and the Gaussian
FWHM are fit and printed to the screen for the emission line. Notice also
that it fits the background between the two places you pinned the fit, so it
only shows the flux in the emission line. If you instead
type 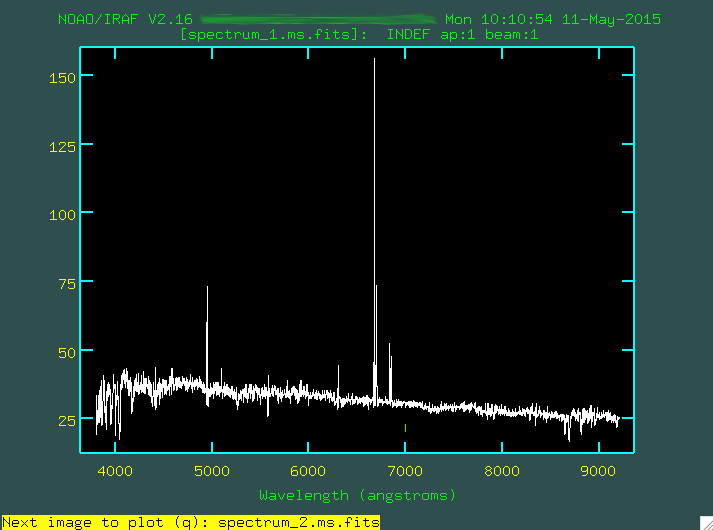 You can then press enter, and the second spectrum will be overplot:
 Now, you may want to zoom in, but if you were to try to zoom in when two
spectra are being overplot using
Now, you may want to zoom in, but if you were to try to zoom in when two
spectra are being overplot using 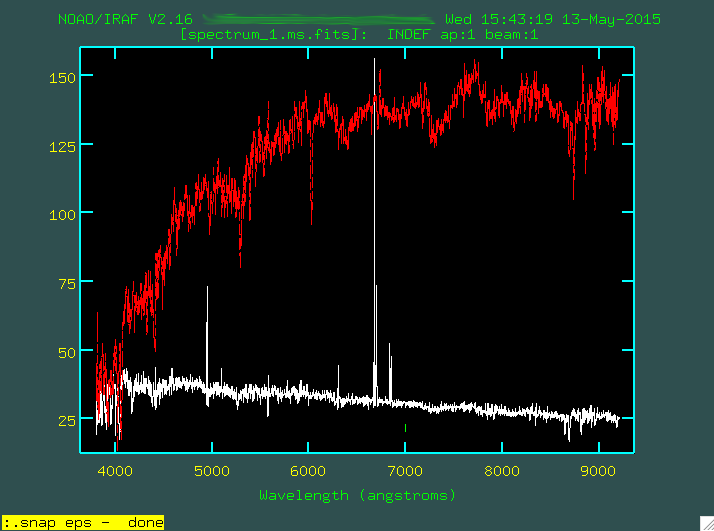 And in the end, I'd get a file in the folder where I'm working with a randomly
generated name that starts with "sgi", in this case, mine was called sgi20298.eps:
And in the end, I'd get a file in the folder where I'm working with a randomly
generated name that starts with "sgi", in this case, mine was called sgi20298.eps:
 That shows the two spectra, with the overplotted spectra presented with a dashed line.
To quit out of
That shows the two spectra, with the overplotted spectra presented with a dashed line.
To quit out of
splot. Now, I think that it's ideal purpose is
taking a quick look at spectra, and not running the final analysis and
line fitting of a spectrum, as there are better tools for that.
But, if you want to look at a spectrum, and maybe explore some of the
line properties, splot is a good way to go.
I've included two spectra in sample_files.zip,
called spectrum_1.ms.fits, for NGC 99, an SDSS optical spectrum. Before we
run splot, let's look at some of the parameters:
  PACKAGE = longslit
     TASK = splot

  images  =   spectrum_1.ms.fits  List of images to plot
  line    =                       Image line/aperture to plot
  band    =                    1  Image band to plot
  (units  =                     ) Plotting units
  (options=       auto histogram) Combination of plotting options:
                                  auto, zero, xydraw, histogram,
                                  nosysid, wreset, flip, overplot
  (xmin   =                INDEF) Minimum X value of initial graph
  (xmax   =                INDEF) Maximum X value of initial graph
  (ymin   =                INDEF) Minimum Y value of initial graph
  (ymax   =                INDEF) Maximum Y value of initial graph
  (save_fi=            splot.log) File to contain answers
  (graphic=             stdgraph) Output graphics device
  (cursor =                     ) Graphics cursor input
There are more parameters, but these are some vital ones. Most importantly,
set the options = auto histogram, which will automatically update
the plot if changes are made, and then plot everything as a histogram, the
default way that one-dimensional spectra are plotted. Also, notice that
save_file = splot.log. If you use a built in splot
procedure to measure a spectral feature, the output will be printed to the
screen and put into this file, called splot.log. Finally, notice
that you could hypothetically set xmin, xmax,
ymin, or ymax to focus on a part of the spectrum
you cared about. This could be done, as we discussed above, from the command
line or from the parameter file like this.
To run splot, you should type:
> splot spectrum_1.ms.fits
You'll be presented with the full optical spectrum in an irafterm window:
If you move the mouse around, you'll find that it is accompanied by a big
red crosshair, which is helpful, especially for estimating the wavelengths of
spectral features. Along the bottom axis is the wavelength, often given in
terms of Angstroms, or pixels, if a wavelength solution has not been applied
to the one-dimensional spectrum. Along the left axis is the flux, which in
this case is given in terms of f_lambda units of 10^-17 erg/s/cm^2/Angstrom,
which is how it was downloaded from the SDSS servers.
The first thing you might want to do is zoom in and out of the spectrum to
better focus on a section of interest. To do this, you'll want to type w
(window), and then move the mouse to the bottom left corner of the region
where you want to zoom in. So, if we want to focus on those strong emission lines
at around 6700 Angstroms, we'd move the mouse here:
And then we'd type e to set that as the bottom-left corner. Next,
we'd move the mouse to the top right-corner of where we want to zoom in:
And then we'd type e once again, which will zoom in:
Pretty neat! If we wanted to zoom back out, we'd type w n, which
zooms out in the flux (up and down) direction to show all of the visible data, and
w m, which zooms out in the wavelength (left and right) direction
to show all of the available wavelengths.
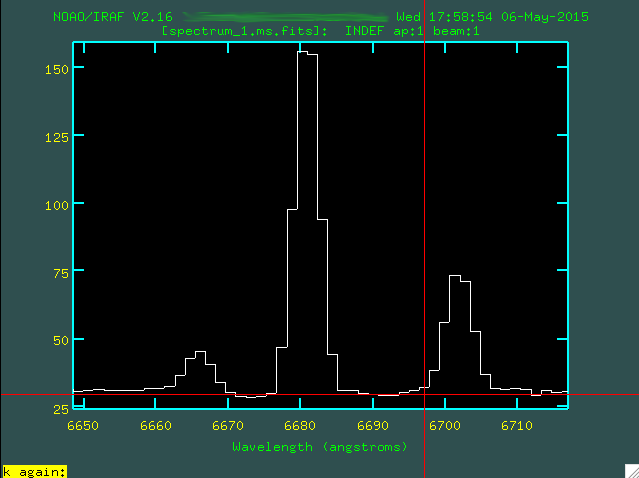
So, I decided to keep zooming in on the [NII] and H-alpha emission region for this
object:
Here, we can see three emission lines. If we wanted, we could put the mouse
over one of the lines, and press the space bar:
In yellow, you can see the wavelength of the cross hair, the flux at the cross
hair position, and the flux of the spectrum at that wavelength. This is a
pretty useful bit of information!
We can actually look at some statistics from sections of a spectrum
using m. I generally use this on continuum regions, but if
you move the mouse to one section of the continuum and type m:
...and then another section a little ways away and type m
again:
...another box will appear showing some information about this section
of the spectrum:
This is the average value of the flux in this range, as well as the rms of
the flux, and the signal-to-noise ratio. This allows you to get a good idea
of what the noise is, so what the flux would have to be of a line to be
detected.
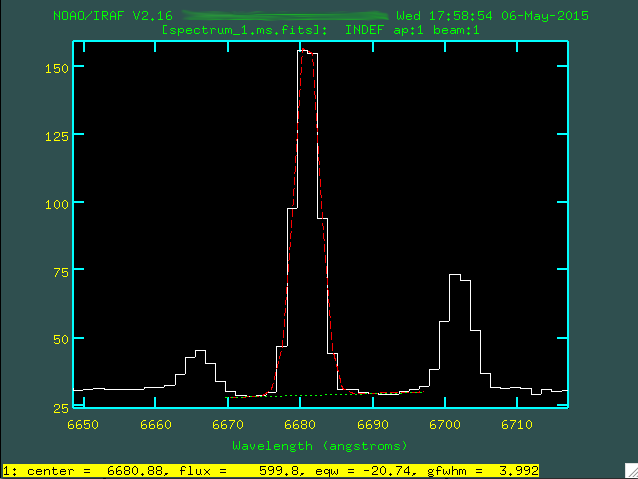
Another important aspect of splot is that you can measure the flux
in emission line regions. First, you can fit Gaussians to the emission lines
using k. Similar to when we used m above, we can
position our mouse on either side of an emission line on the continuum and
press k:
Here, the centroid, the flux, the equivalent width, and the Gaussian
FWHM are fit and printed to the screen for the emission line. Notice also
that it fits the background between the two places you pinned the fit, so it
only shows the flux in the emission line. If you instead
type e, it won't fit the line, but will instead just sum the flux
between the points where you typed e.
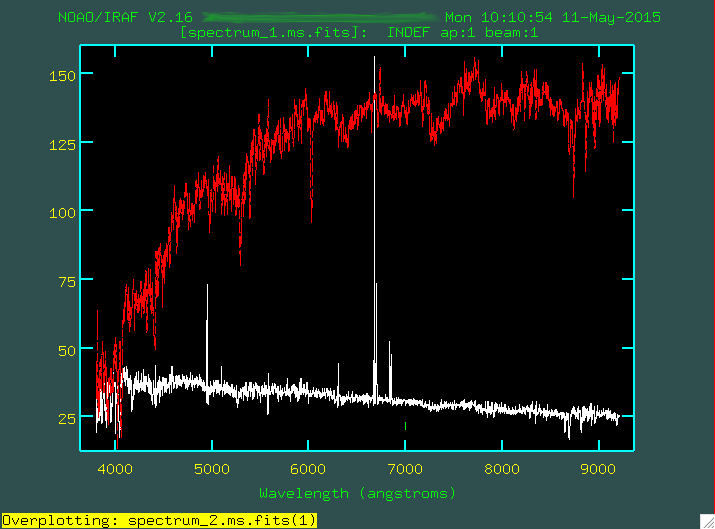
At some points, you may want to compare spectra, and splot actually
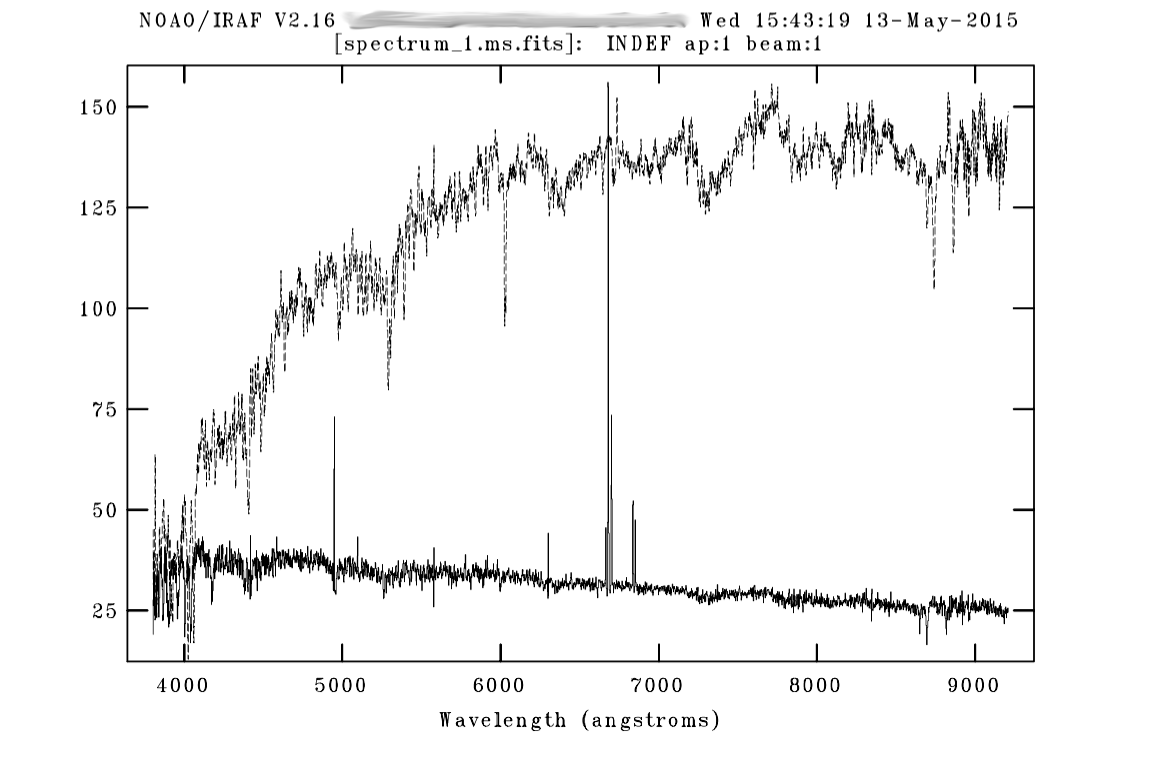
allows you to overplot two spectra in different colors. In the sample_files.zip
archive, you'll find a second spectrum, spectrum_2.ms.fits, which is an SDSS
spectrum for the elliptical galaxy NGC 7108. If you have both files in the same
folder (you could do this if the files were in different folders, but you'd have
to just specify the path, which is tedious), you can open one up:
> splot spectrum_1.ms.fits
And, then, you'd type o g, which tells splot that you
want to overplot another spectrum. At this point, if you type in the name of
the spectrum (or the path and the name of the spectrum):
You can then press enter, and the second spectrum will be overplot:
Now, you may want to zoom in, but if you were to try to zoom in when two
spectra are being overplot using w and e, you'll find
that you actually zoom in on the overplot spectrum, which in this case is
spectrum_2.ms.fits, and you'd end up not being able to see spectrum_1.ms.fits.
As a result, you have to be careful, and zoom in on the first spectrum, and
then use o g to overplot. If you mess up, you can quit out, and try
again.
In an splot window, it is possible to print the screen to an
encapsulated postscript (.eps) file, to be looked at later. For the purposes of
this webpage, I've been performing screen captures outside of IRAF to show
the plots. If I wanted to print the above screen to a file, I'd type :.snap eps
(notice the dot in there before the word snap, it's important):
And in the end, I'd get a file in the folder where I'm working with a randomly
generated name that starts with "sgi", in this case, mine was called sgi20298.eps:
That shows the two spectra, with the overplotted spectra presented with a dashed line.
To quit out of splot, type q, and IRAF will allow ou
to input more commands on the command line. You can now take a look at the splot.log
file:
  > cat splot.log
  May  6 16:20 [spectrum_1.ms.fits]:
  avg:      31.16  rms:     0.6356   snr:    49.02

  May  6 17:59 [spectrum_1.ms.fits]:
    6680.875  28.91422   599.812    -20.74   141.168     3.992        0.
And you can see that the values we just calculated above were printed to the file,
with more significant digits! This is really helpful.
More To Come!
^ Go to Top
This page isn't done!
% I'm still working on it!